Updating Our Builder Grade Fireplace and Mantle
I knew I wanted to add some visual interest to the fireplace, specifically something that ran from the mantle shelf to the ceiling. These builder-grade fireplaces feel so unfinished to me and as someone who uses the fireplace weekly, I wanted to create something worthy of all the spotlight.
There are lots of different ways to elevate a basic fireplace. From adding new tiles to the facade or replacing the mantle shelf, there are so many ways to personalize a builder-grade fireplace.
Before we dive into how we updated our fireplace, I thought it would be helpful to include this graphic from Pinterest. Other than the mantle, I could not have named the prior to this. But to explain all we did, I’ll be using their real names rather than “that thing around the hot fire part.” So let’s learn together:

Vertical Shiplap Fireplace Detail
What You’ll Need:
Tongue and groove shiplap board: We used unfinished wood planks
Shellac primer: We used B-I-N
Paint: We used Benjamin Moore Regal Select mixed in Sherwin Williams Tricorn Black
Paint supplies
Miter saw (or regular saw if your ceiling is not slanted)
Brad nailer (and nails)
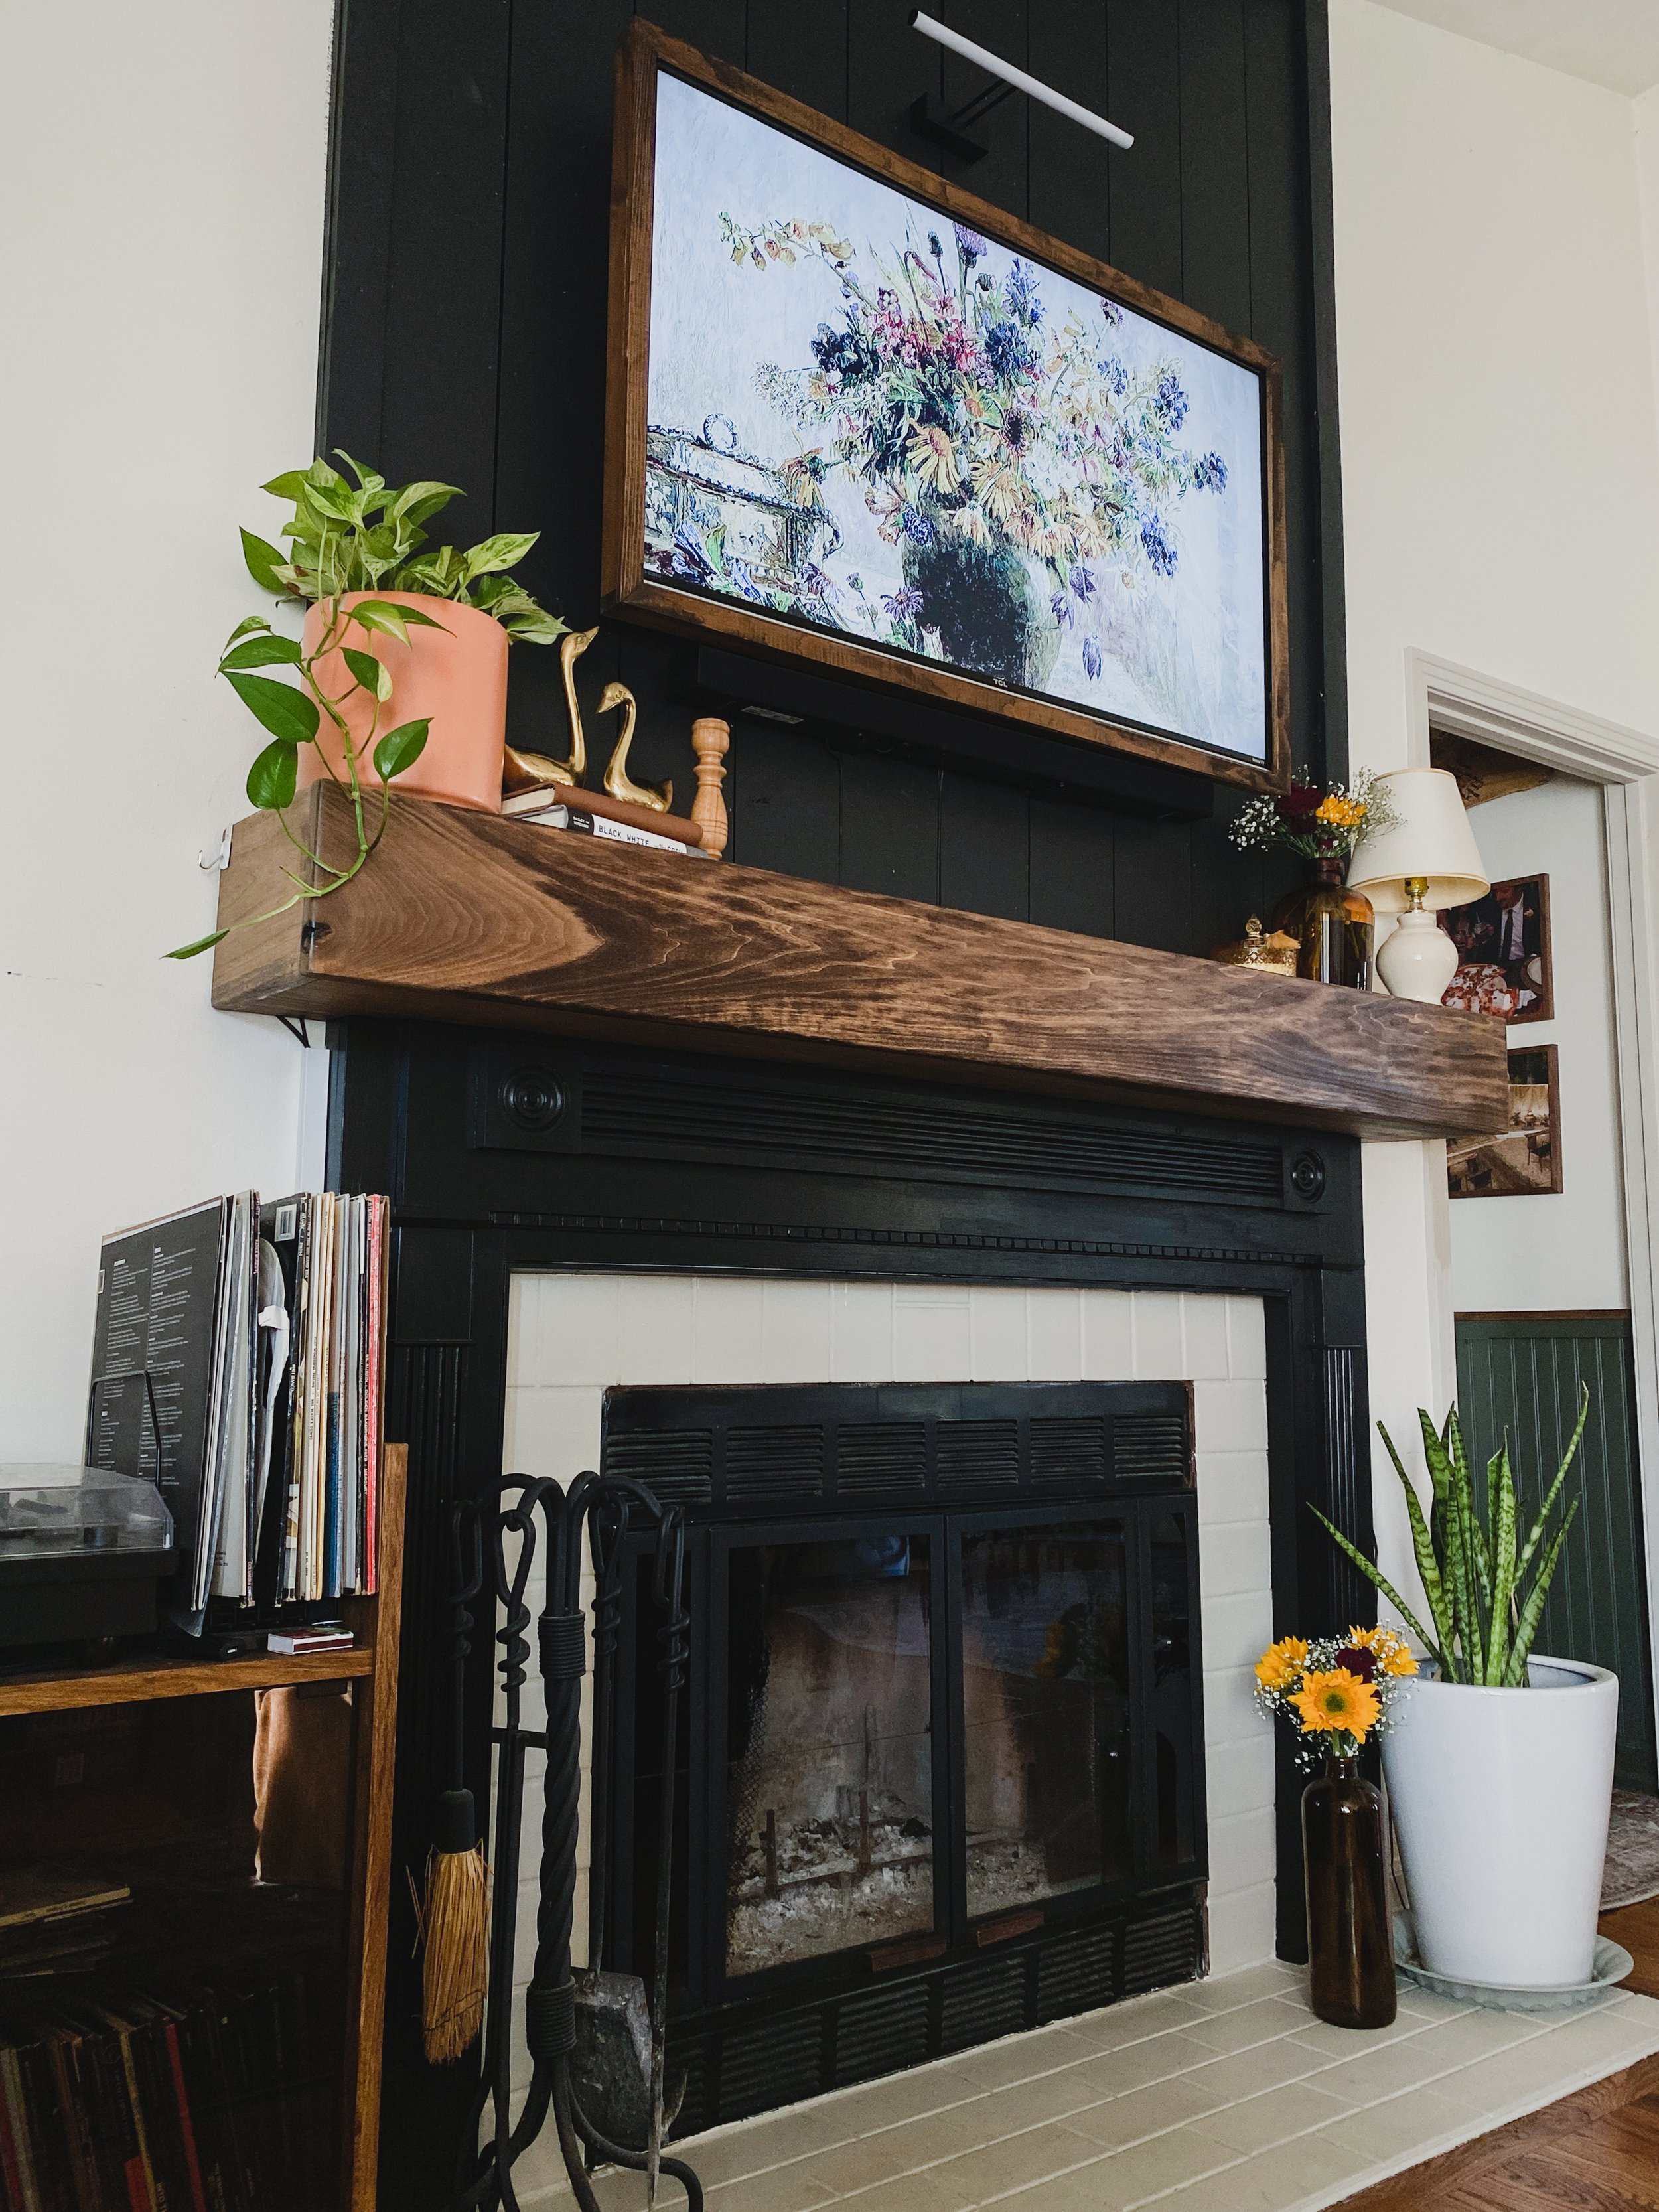
Because of the placement of our fireplace – right by our front door – I didn’t want to add much depth to the fireplace itself. I didn’t want it getting in the way of people entering our home. So we opted for a shiplap panel wall. To modernize the shiplap detail a bit, we ran it vertically rather than the traditional, farmhouse-style horizontal style. Then we painted it black.
Watch our Fireplace Highlight on Instagram.
We figured out the angle at which to cut our shiplap panels so that they would extend to the ceiling. This was by far the most confusing part. The numbers will differ from home to home, but we found the degree of angle on the far left side of the panel wall and the angle on the far right side of the panel wall was not even… so we had to measure each plank and cut each one to accommodate for the uneven wall.
“If I’ve learned anything in DIY home improvement projects… no wall is even.”
Once the boards were cut, we painted and sealed them with polyurethane.
Tip for painting boards or anything that has sides: use take-out containers or plastic cups to raise the boards off the floor.
After the paint and sealant have dried, it’s time to get these boards on the wall. We attached the shiplap panels using brad nails. This was the most fun part. Seeing it all come together while using a fun power tool was exactly what we needed after the measuring debacle.


After all of the shiplap boards were up on the wall, we added the trim pieces. We used three pieces to frame out the left, right and top side of the panel wall. We laid these pieces directly over the shiplap and attached them together. We wavered over whether to do this and I am so g lad we did. It absolutely makes a huge difference in making the fireplace look finished and professional.
We originally had our TV above the fireplace and since this is our main living space, we wanted to re-mount it on top of the new fireplace panel wall. In hindsight, we could have attached the TV mount to the wall and built around it with shiplap, but we didn’t want any future residents to be stuck with a hole in the wall.
Watch the photo reel on TikTok
TV Frame & Flat Mount
What You’ll Need:
Nail gun (and nails)
To give us the option to “hide” the TV, we decided to build our very own TV frame and utilize it as a place to showcase artwork. The Samsung TV Frame goes for around $2000, which was completely out of our budget. While I have heard incredible reviews, we opted for our own DIY solution.
Watch the Instagram Story here.
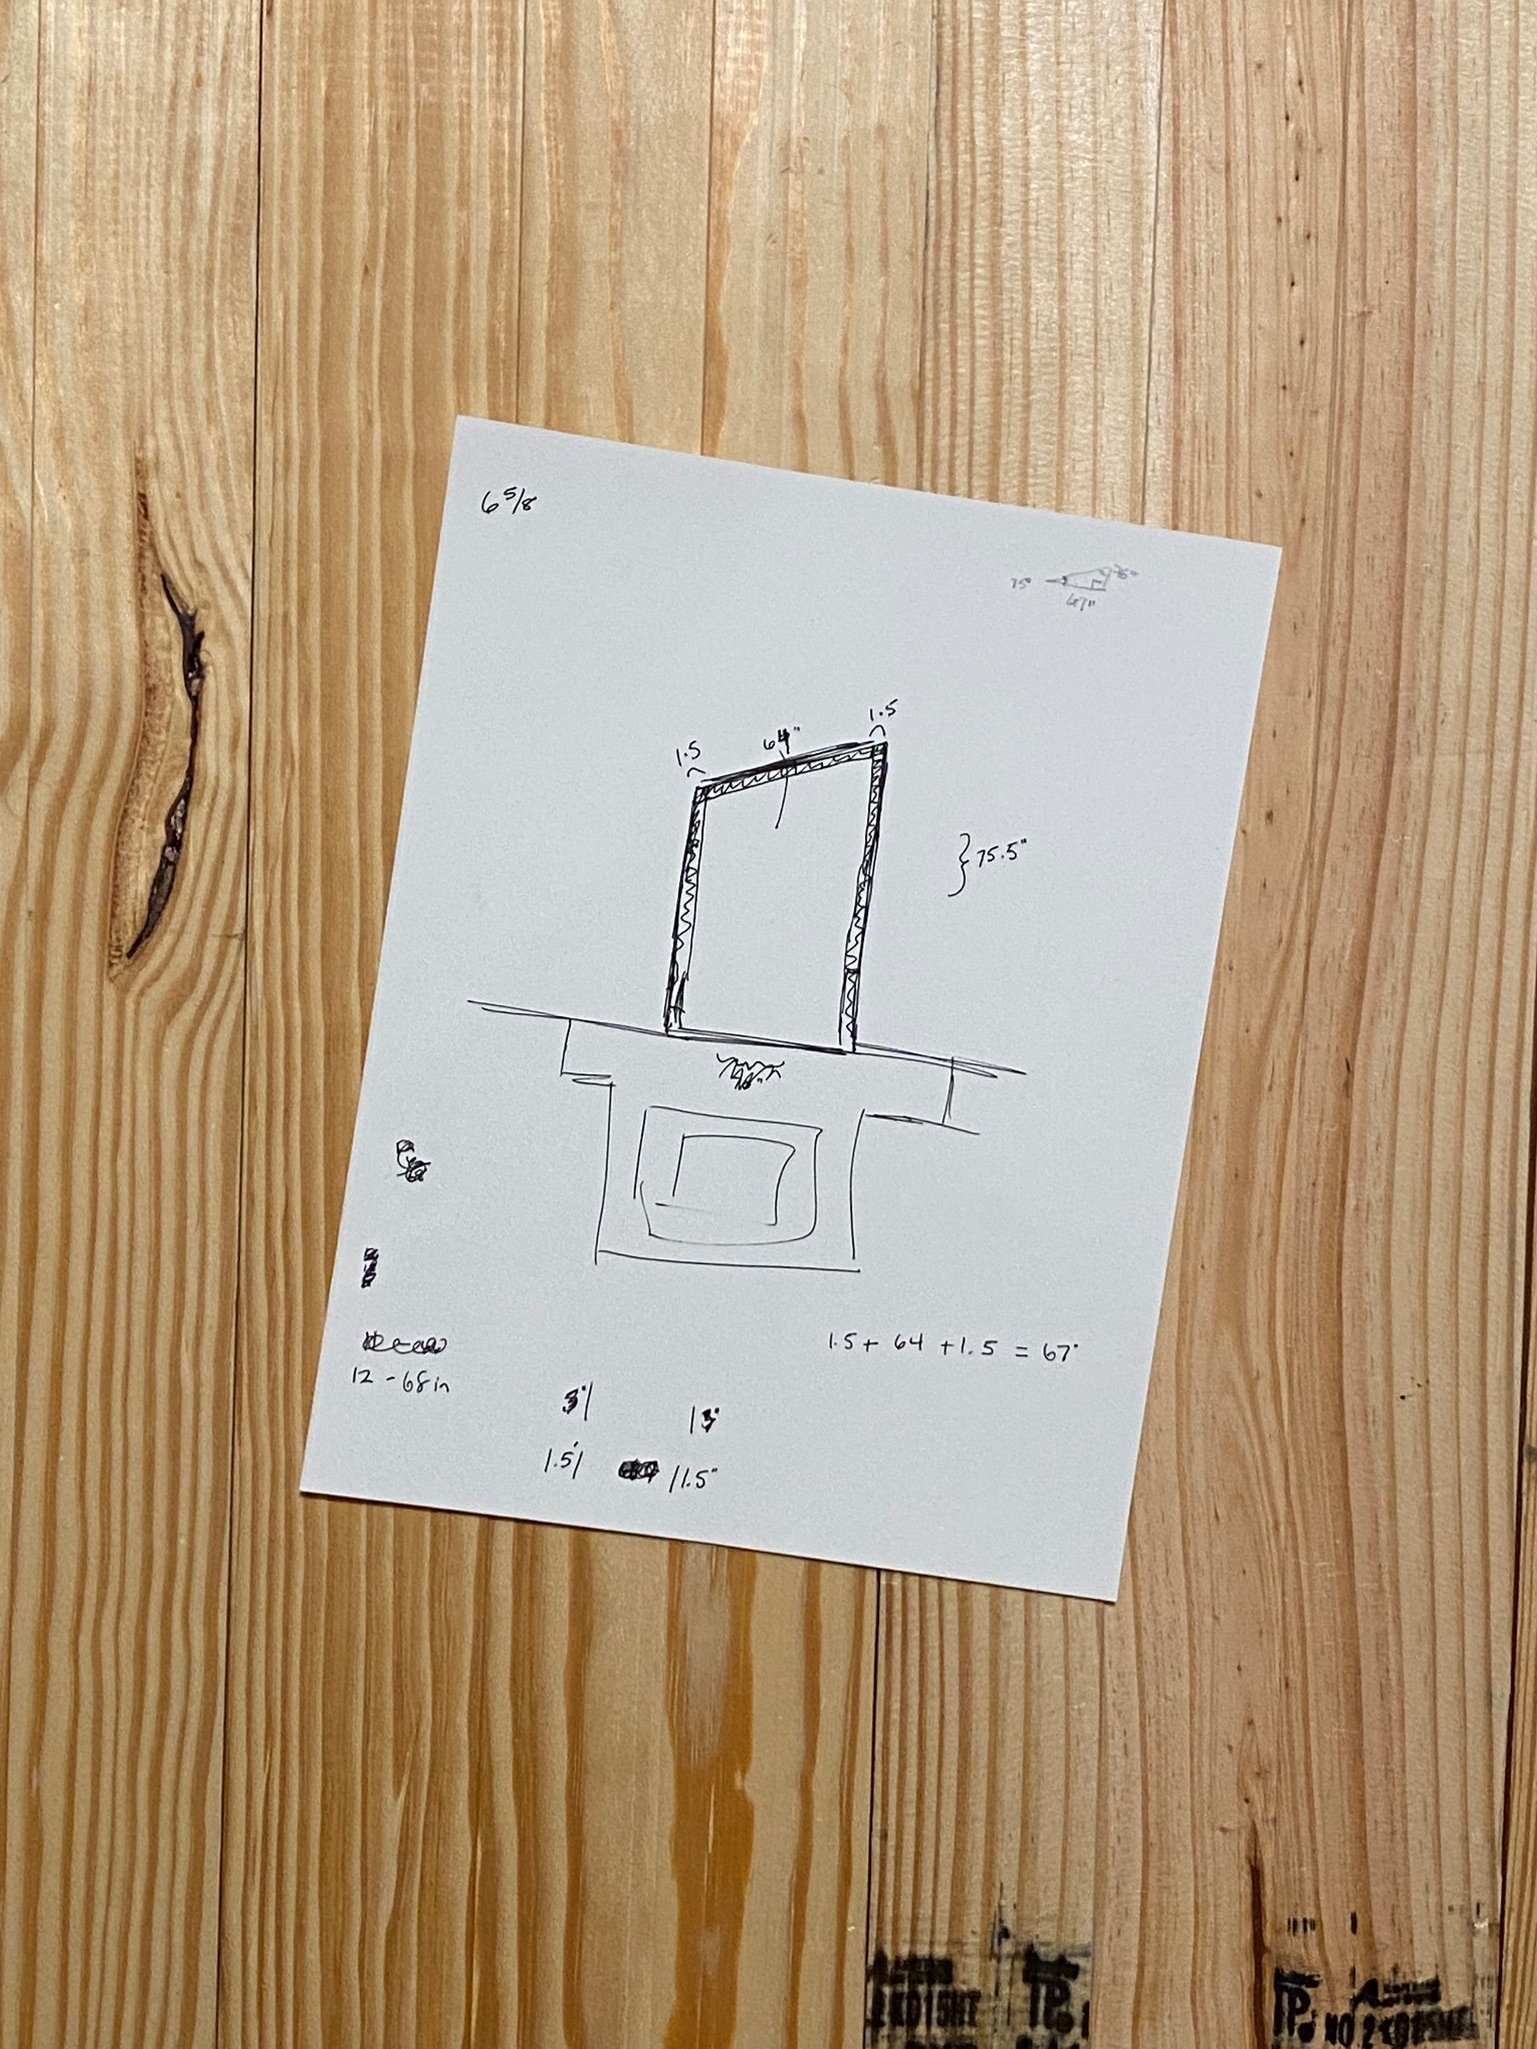
For any flat-screen TV, this process will work. Just adjust your measurements depending on your TV size. Our TV is 50 inches, which means it’s 43.94 inches by 25.67 inches including the TV’s casing. I used the 1x2 strips to create a box that would slide over the side of the TV. In all transparency, I totally mismeasured and had to rebuild this twice. So be patient with yourself.
Once the box was complete, I used thinner trim pieces, mitered, to add a decorative frame. Mitered edges just mean their cut at an angle to form a right angle. It looks more professional and finished and is very easy to do. Just cut each piece at a 45-degree angle with your miter shears or miter saw.
Pro tip: cut the angles just slightly smaller than 45 degrees and fill in the rest with wood filler. For some reason, these cuts almost never perfectly line up.
I attached all of the sides with good glue, clamped them, and let them dry. Once it was dry, I secured it with brad nails and it was ready to be stained. I first sanded it and used pre-stain to condition the wood and prep it for stain. You could also paint it or add some embellishments.


To add to the illusion of a framed piece of art, we switched out our old swivel TV mount and replaced it with a flat mount. This keeps the frame close to the wall and looks more like art. To complete the look, you can download images or simply play a YouTube slideshow on your smart TV. Boom — free art.


Painted Tile Hearth & Wood Facade
What You’ll Need:
Paint: I used normal interior paint on the tiles and wood facade
Paint supplies
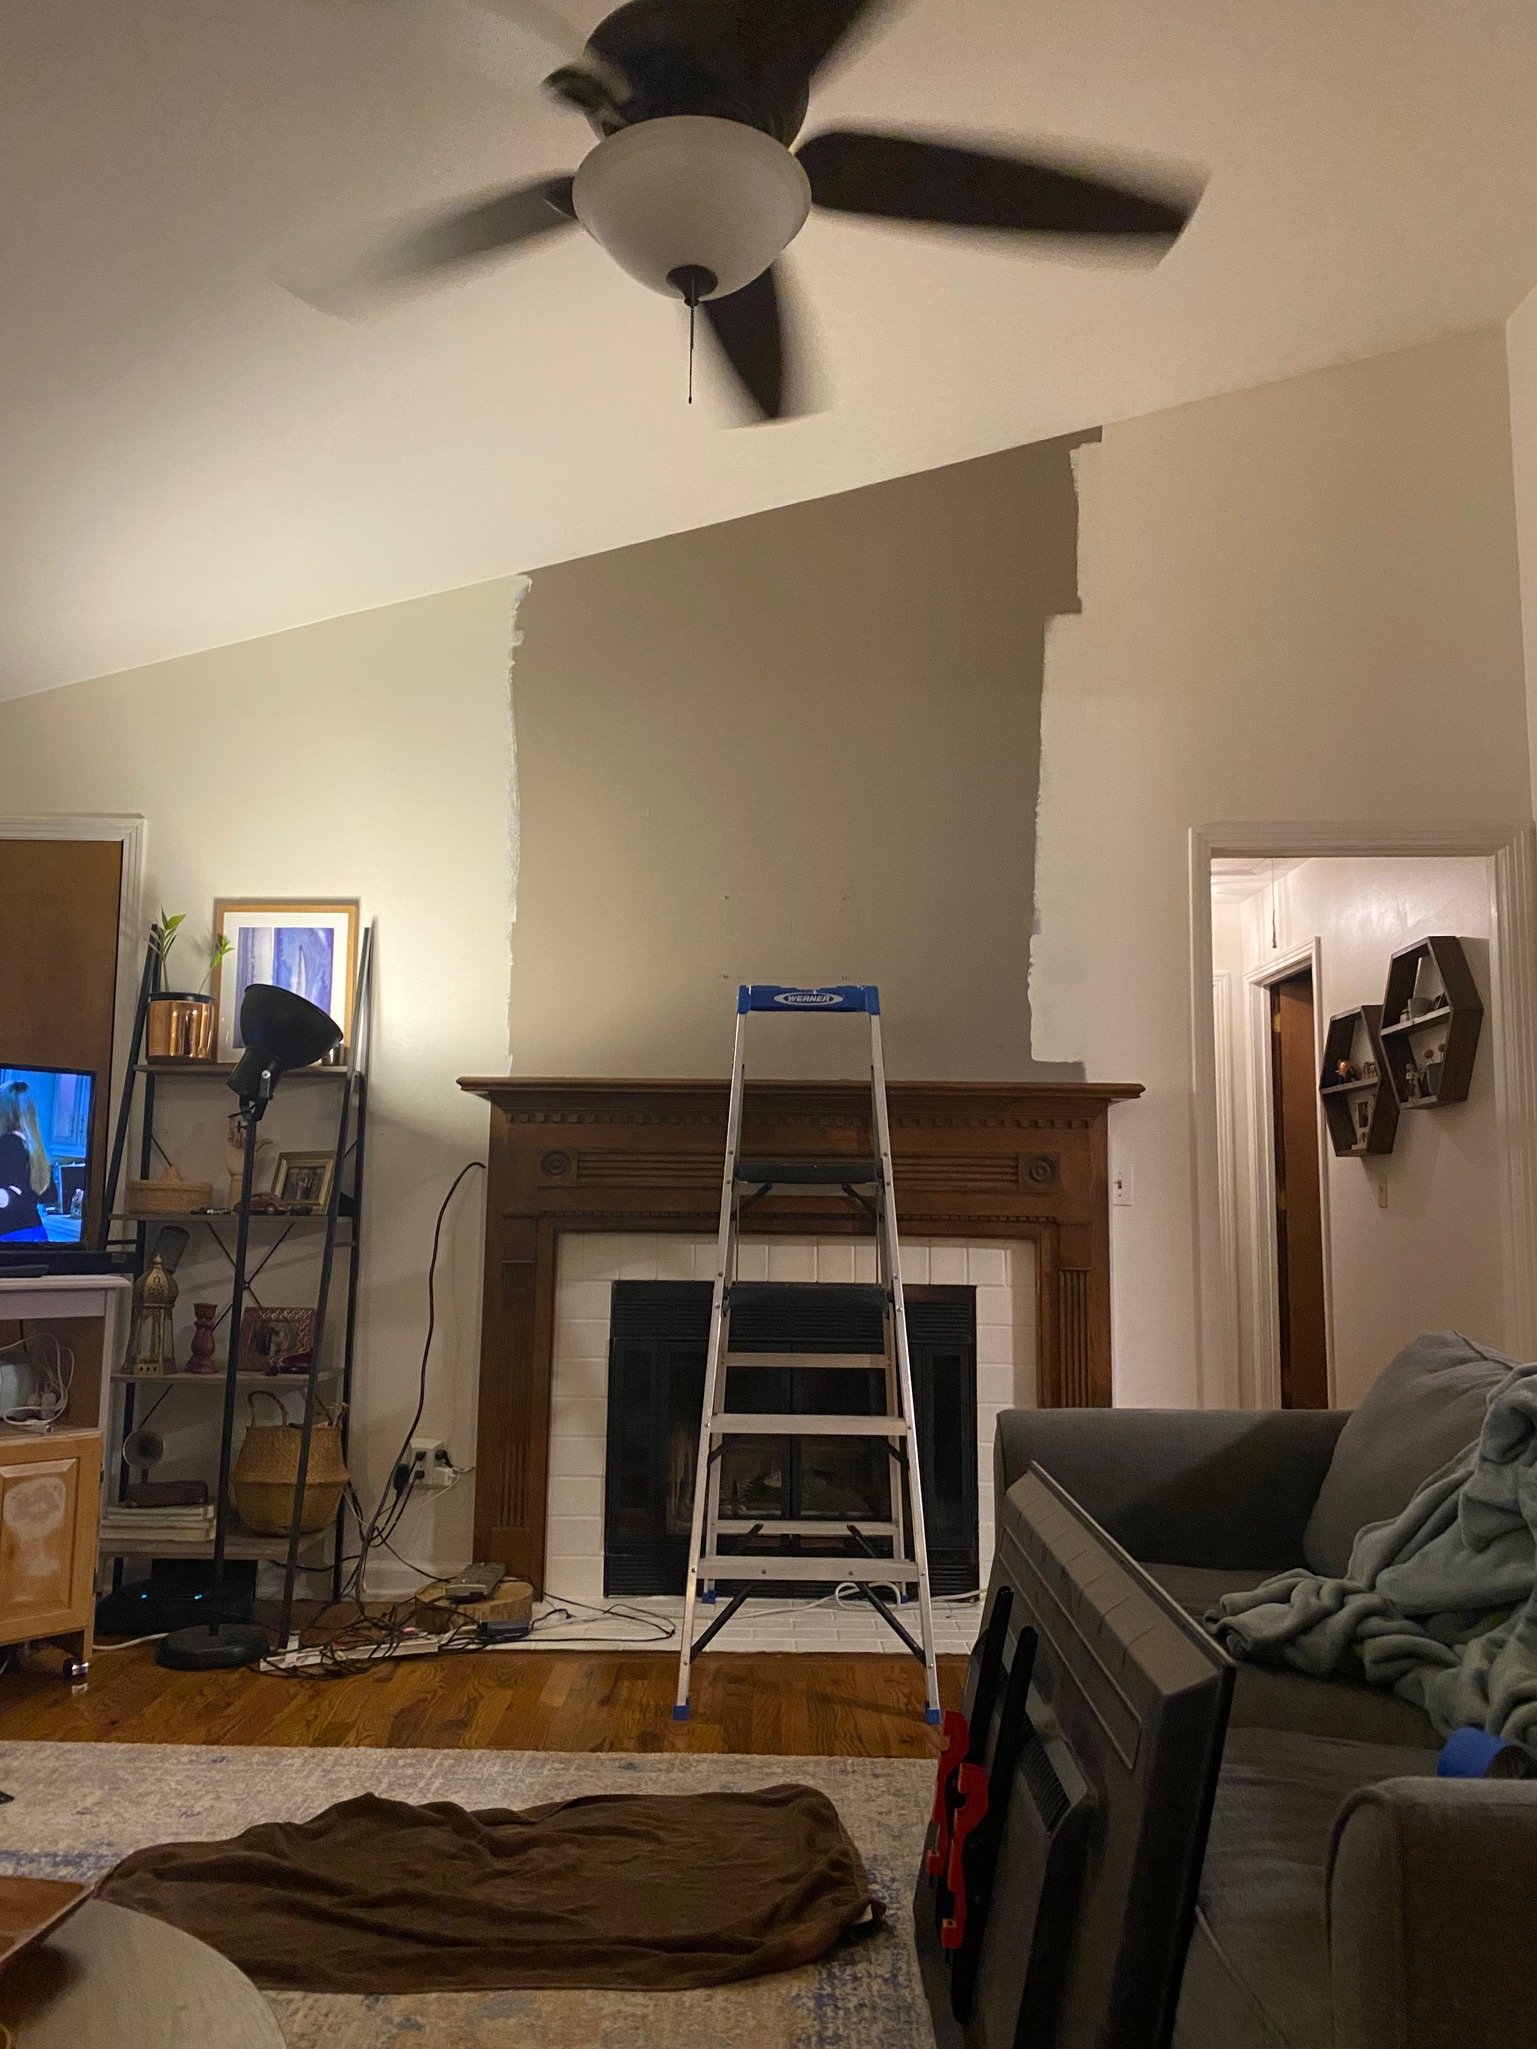
About a year after we added the shiplap panel wall, we were ready for another change. While I like the stained wood, I wanted to modernize the fireplace even more.
To begin, I painted the tile hearth and legs. I actually just used an old sample color I had picked up. It was previously painted Pure White, but had gathered soot and grime over the years and needed a refresh. I have personally used regular interior paint on these tiles and have had no issues. The first paint job lasted through lots of fires and cleaning over three years.
When painting the wood facade, I primed the entire thing with shellac-based primer. This gave the paint something to stick to. I used the same paint for the wood facade as I did for the panel wall: Tricorn Black. This instantly made the fireplace look more modern and sleek.


DIY Mantle Shelf
What You’ll Need:
maple boards
sander
jigsaw
brad nailer
stain
polyurethane
staining supplies
optional: router
I’ve always been annoyed with our mantle because it is so narrow. Half the fun of having a fireplace is decorating it — especially for holidays — and we couldn’t even hang our stockings up here because of how shallow the mantle sat off the wall. I knew I wanted to create a larger faux mantle that would add more dimension to the fireplace.
My good friend Meg over at @baker.blooms crafted a three-sided box to slide over her existing builder-grade fireplace. I used her makeover as our inspiration.
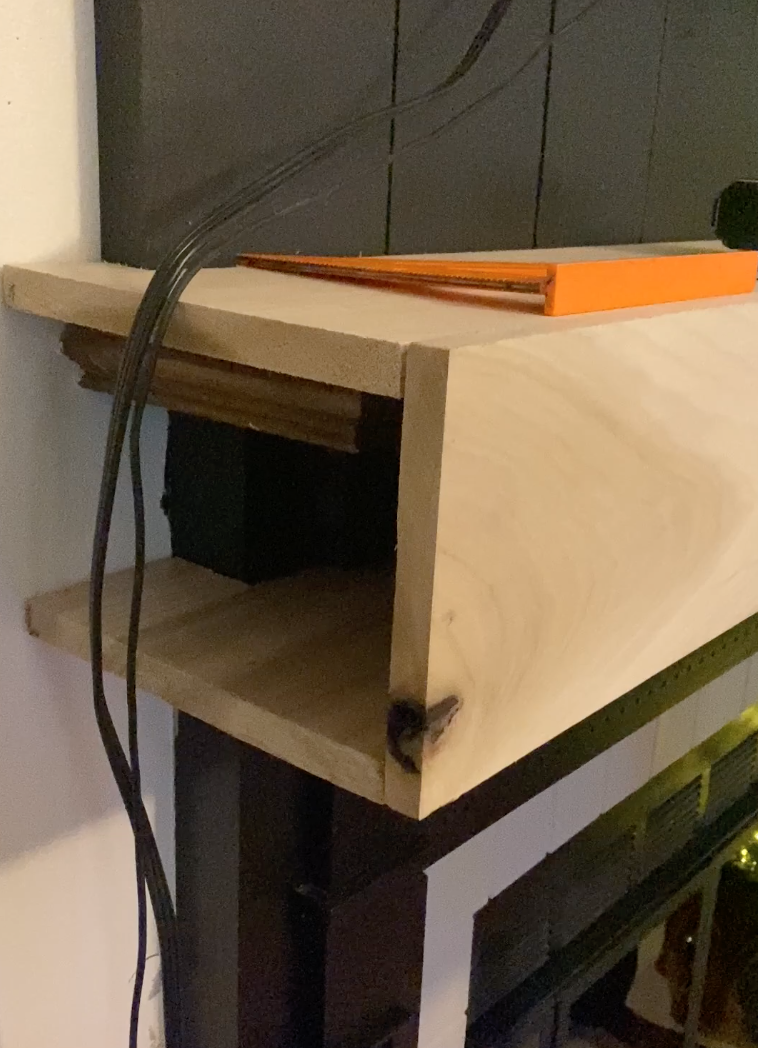
We spent money on hardwood panels because we wanted the stain to soak in evenly and we wanted the edges to be as smooth as possible. This was worth the upcharge for us. We used our miter saw to cut three hardwood boards to length. These three panels will make up our box. You can miter the edges of these pieces to create a clean mitered edge, or you can just straight cut them as we did. We planned on filling the edges to create the appearance of one solid wood slab rather than a box, so it wasn’t necessary for us to miter the edges. Instead, we lined up the three-sided box and used wood glue, brad nails, and clamps to adhere the panels together.
Because we opted to leave the existing mantle in place and simply slide the new one over top, we had to notch out a small section in the base of the new mantle to accommodate the existing header. Similarly, we had to cut a small section out of the top of the new mantle to fit snugly around the trim pieces of the panel wall. We used our jigsaw to make these cuts.
Once the box was constructed, we closed the edges with wood filler. After sanding down the dried wood filler and using out router to round the edges, this box no longer looked like three separate boards glued together, but rather one solid wood structure.
To finish the mantle, we stained it with Varathane’ Early American Classic Wood Interior Stain and sealed it with clear satin polyurethane.


Picture Light Detail & Decorations
To finish the entire look, we added this battery-powered light to go over the TV. It just gives it that finished look and when the TV is acting as art, the light helps to continue the illusion. I found this one at a garage sale, but here’s a similar one on Amazon.
Conclusion
Overall, I am so pleased with the way this fireplace turned out. Over two years, we transformed this so-so, builder-grade fireplace into the focal point of this cozy space. With a little bit of paint and some creativity, we were able to replicate a designer look for much less. Here’s the total cost of this project:
Shiplap wall panel: $150
Paint: FREE (used left over materials, but would have cost $45)
TV frame: FREE (used left over materials, but would have cost $15)
Mantle: $100
TV mount/frame/accessories: $50
TOTAL: $300